Visual Basic 5.0 program "VB Train" & "VB2010 Train" - Description and operation

Introduction and Purpose

The purpose of this document is to discus both programs "VB Train" & "VB2010 Train".
Both both are functional identical. "VB Train" is writen in Visual Basic 5.0 and "VB2010 Train" in Visual Basic 2010 Express.
Both programs are used to demonstrate the Length Contraction, a visible illusion by performing a simulation of a train around a race horse track.
To download an executable VB Train.exe select: VB Train.zip
To download an executable VB2010 Train.exe select: VB2010 train.zip
For more information goto: Implementation details

Contents


Description

For a description of the mathematics (physics) involved see the above link. The importance of the program is that it is a simulation what an observer observes (sees) from a fixed point.

Operation - Control Display - Initial

Immediate after being started the program shows the Start and the Cancel push buttons.
Select the Start pushbutton.
The display changes. See picture 1
Picture 1
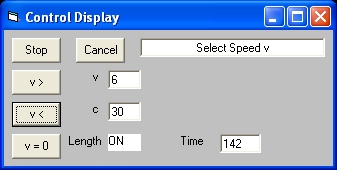
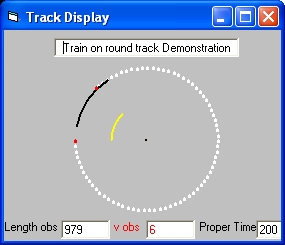
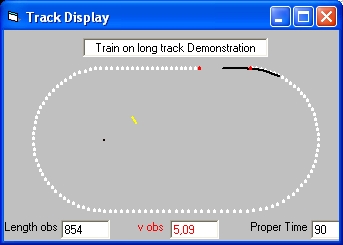
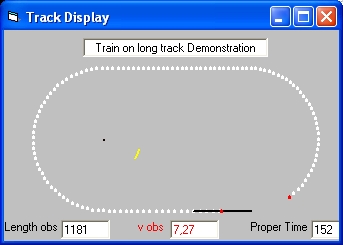
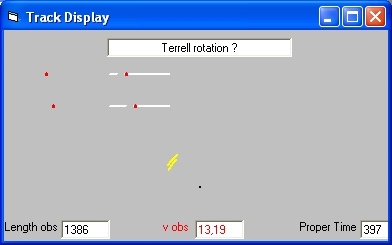
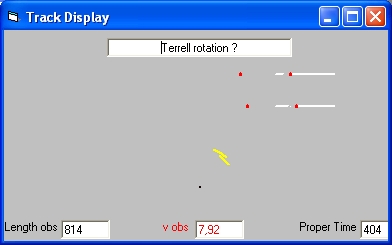
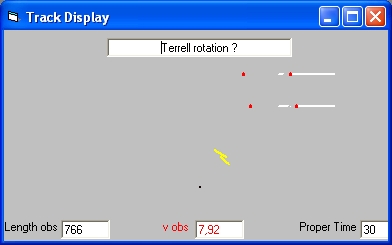
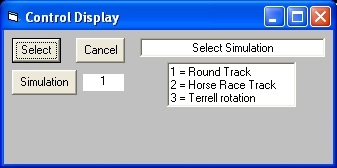
The purpose of the display is to select a simulation and to start the simulation.
Three simulations are possible:
  1. Type 1; This demonstrates a round track.
  2. Type 2; This demonstrates a race horse track
  3. Type 3; This demonstrates two long trains (Terrell rotation)
In order to select an experiment the Simulation parameter is used The initial value is 1: Round Track Simulation.
When the Simulation parameter is selected the value is incremented i.e. becomes the value 2. etc.
When the Select Pushbutton is selected the simulation starts.

Operation - Control Display

Operation of the simulation is done from the Control Display.
Picture 2
The Control Display contains four push buttons: "Stop", "Cancel","V >","V <,"V = 0" and "Freeze" The Display shows the additinal parameters:
  1. The parameter Length Contraction shows if length contraction is used. This parameter can be changed.
    means that no physical length contraction is involved
    means that physical length contraction is involved accordingly to the parameter Lambda
  2. The parameter v shows the actual speed of the train.
  3. The parameter c shows the speed of light.
  4. The parameter Time shows the local time of the watch of the observer.

Track Display

The track display shows the result of the simulation.

Picture 3
Length Contraction = Off

Picture 4
Length Contraction = On
Picture 5
Picture 6


Time Dilation / Clock Dilation

Time Dilation is standard implemented using Special Relativity. That means that the moving clock (on the train) runs slower than the clock at rest.
To demonstrate this you have to compare the parameter Time on the Control Display with the parameter Proper Time on the Track Display.
To demonstrate this, you have to do is to increase the speed of the train to a value larger than 10. When you do that you will observe that Proper Time runs behind Local Time.
The maximum will be reached when v = 30, which is equal to the speed of light. In that case the parameter Proper Time will become froozen.
In picture 3 & 4 both the time Local Time is 204 and the Proper Time is 200
In picture 5 the time Local Time is 91 and the Proper Time is 90
In picture 6 the time Local Time is 155 and the Proper Time is 152 and


Physical Length Contraction

Physical Length contraction is an option. To include physical Length contraction you have to change the parameter Length Contraction from OFF to ON.


The Command "V = 0"

The parameter "V = 0" is specific important to demonstrate Terrell rotation, Specific for Simulation 2 i.e. "The Race Horse Track" with parameter "Length Contraction" = OFF.
To demonstrate select "Start", Select Simulation 2, select "Select" and increase the speed to 5.

Terrell Rotation

In the simulation of Terrell Rotation two trains are used. For a description See: Terrell Rotation

To perform a simulation:

  1. Select Start Push button.
  2. Select Simulation 3
  3. Select Select Push button.
  4. Select v> Push button 10 times slowly. Finally you will get v=10. Observe how the train moves from left to right.
  5. Select Freeze Push button. This will freeze the display.
  6. Select Length Contraction ON
  7. Select UnFreeze Push button. This will unfreeze the display. Observe how the train moves from left to right.
Train operation
Picture 7
Train operation
Picture 8
Picture 7 and Picture 8 show Terrell rotation with "Length Contraction" = OFF with the train moving from left to right.
  1. Picture 7 shows the train left from the center. Picture 7 also shows length expansion.
  2. Picture 8 shows the train right from the center. Picture 8 also shows length contraction.
When Picture 7 is selected you can see the train at the fartest left.
When Picture 8 is selected you can see the train at the fartest right.
Train operation
Picture 9
Train operation
Picture 10
Picture 9 and Picture 10 show Terrell rotation with "Length Contraction" = OFF with the train moving from left to right.
  1. Picture 9 shows the train left from the center. Picture 9 also shows length expansion.
  2. Picture 10 shows the train right from the center. Picture 10 also shows length contraction.
When Picture 9 is selected you can see the train at the fartest left.
When Picture 10 is selected you can see the train at the fartest right.


Reflection 1 - General


Reflection 2 - frequency & Doppler effect

However there is one more issue. As part of the simulation the observed length of the train changes. Suppose the train emits a light with a certain frequency. What are the consequences with the observed frequency, if any.


Reflection 3 - Length contraction

In this reflection different aspects of Length contraction are discussed.


Reflection 4 - How to demonstrate physical length contraction.

There are two approaches to demonstrate physical length contraction assuming the length of the train is l.
  1. In the standard approach is to place as many clocks as possible along the horse rack track in simulation 2, a distance l apart. The same can be done in simulation 1 and 3.
  2. a different approach is to place two clocks at the beginning at end of the train, but that is more to test time dilation or better the physical behaviour of a clock
At the beginning of the experiment (v=0) all the clocks along the track should be synchronized such that they all show the same proper time.
The basic idea is that all clocks in the reference frame of the track (are at rest) and indicate the same time.
As part of the experiment there are two observers at the beginning and end of the moving train. The whole experiment exists that each observer writes down, when his position coincides with a clock (at rest) the number of counts of the clock at rest. At the end of the experiment both observers should compare their results. All of this can only be decided by a real experiment. In fact the same experiment should be performed in both directions.


Reflection 5 - Time dilation

Time is something that has to do with the existance of the Universe and with our existance. Existance and the concept of time are inherent coupled together. They are inseparable.
The universe as a whole changes and evolves constantly. The same for our galaxy and the same for our planet, the earth.
Humans also change and for each individual we call, that he or she becomes older in time. We could also consider that the Universe changes in time, what we mean then is some sort of universal time which defines the age for the whole of the universe. (Which came into existance at the moment of the Big Bang?)

In this reflection different aspects of Time dilation are discussed. Time dilation is closely related to the behaviour of clocks.


Reflection 6 - More to read


Feedback

None


Original 24 April 2013
Modified 25 Mai 2013
Modified 10 April 2014
Modified 25 April 2015
Modified 29 September 2017
Modified 1 Februari 2020

Back to my home page: Contents of This Document